BayDeltaLive.com Help Guide *Under Construction*
Map Builder
Using base imagery
Using the imagery menu you may customize your base map using GOOGLE MAPS, BING MAPS or ADDITIONAL IMAGERY/Custom tiles. Additional imagery can include Lidar data, USGS Topos or Shaded relief and can be added on top of base map imagery. To add custom base layer contact support@BayDeltaLive.com.com
It is important to note that the base layer must be chosen first. If you Whenever the base layer is changed, all other layers on the map will be reset.
Using Map Layers
1. To view layers on the map:
a. Mouse over LAYERS on the MAP MENU for quick adding options. Simply scroll to the layer you wish to choose and click on the check box. Allow a few seconds for the layer to fully load.
OR
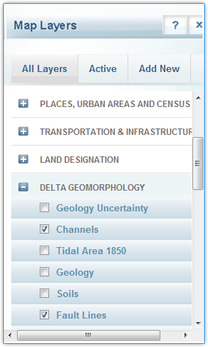
b. Click on THE LAYER tab from the MAP MENU. The layer manager will launch. You may turn layers on and off by opening a folder and choosing from the list of layers. The map legend will appear below the layer you are working with.
To turn a layer off, click on the title of the layer and it will return to the list.
Map Tools

1. Navigate:
2. Zoom:
3. Draw:
4. Measure: Choose from the measure tools:
a. Measure Distance: To measure a distance, click on the map to anchor your first point. Double click on the map to end the distance you are measuring. The result will appear in your measure widget.
b. Measure Area: Choose measure area from the menu. Click on map to anchor your first point. Continue to create your area by clicking on the map to anchor more points. Double click to end. Your results will appear in the measure widget.
c. Start over: To start over, double click to end previous session or reset map from the MAP MENU.
5. Save View: To save a view, choose SHARE VIEW from TOOLS in the MAP MENU. A form will appear allowing you to add a title and description. You may save your map to project and wiki pages. To allow the pubic to view your map, select the PUBLISH TO PUBLIC FOLDER.
6.
Note: You may save any combination of layers, drawings and real-time monitoring parameters.
5. Share View: To share a view, choose SHARE VIEW from TOOLS in the MAP MENU. An EMAIL FORM will appear allowing you to add the email address and a message for the recipient. The recipient will receive an EMAIL with a LINK to the map room. The map will automatically load for editing and resaving.
6. Default View: Choose DEFAULT VIEW to return your map back to the default extent of the map.
7. Draw: You may draw and save points, lines and polygons with this tool.
a. Points: With the point drawing control active, click on the map to add a point. You can drag the point before letting the mouse up if you want to adjust the position.
b. Lines: With the line drawing control active, click on the map to add the points that make up your line. Double-click to finish drawing.
c. Polygons: With the polygon drawing control active, click on the map to add the points that make up your polygon. Double-click to finish drawing.
d. Freehand: Hold down the shift key while drawing to activate freehand mode. While drawing lines or polygons in freehand mode, hold the mouse down and a point will be added with every mouse movement.
8. Change Map Screen Size: Allows you to extend your map to various screen sizes including full screen and presentation mode. To exit full screen click on the size icon until the map returns to normal view.
Advanced Permission Features (For website editors only):
Editing Layers: Assuming you have editor status, you can edit the Map Layers from the map interface. Click on the edit link next to the layer title. The MAP EDITOR will display giving you the ability to edit the following:
Layer Title
WMS Title
Description
Author
Source URL
Sources
Notes
Publishing Status
Placement in Navigation
Tab Order
File Name
File Type
Cartography: Labels, Colors, Fonts, Label Positions, Line Thickness, Line Type, Line Color, Shape Color, Transparency, Symbols
Projections
Disclosures and Uses
XML
User Permission Level
Using active layers
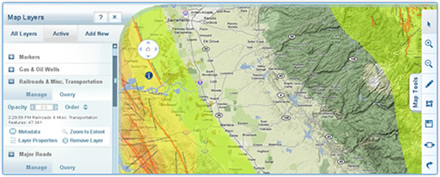
Use the ACTIVE Section to adjust layer ordering, layer opacity, and to open up the metatdata for individual layers. Click on the REMOVE button to remove the layer from the ACTIVE section.